Chapter 3: Operation Homecoming
■ Operation Homecoming I
Shown Enemy Strength: 11,000
Echelon[s] Required: 2 [RF echelon recommended]
S-Rank condition: No Turn Limit. Take HQ.
The first half of Chapter 3 will be Night missions. This map constrains your movements via supplies. You will run out of them and will need to resupply unless you are looking to retreat and respawn from the starting helipads after each Jupiter pass. This is not advised.
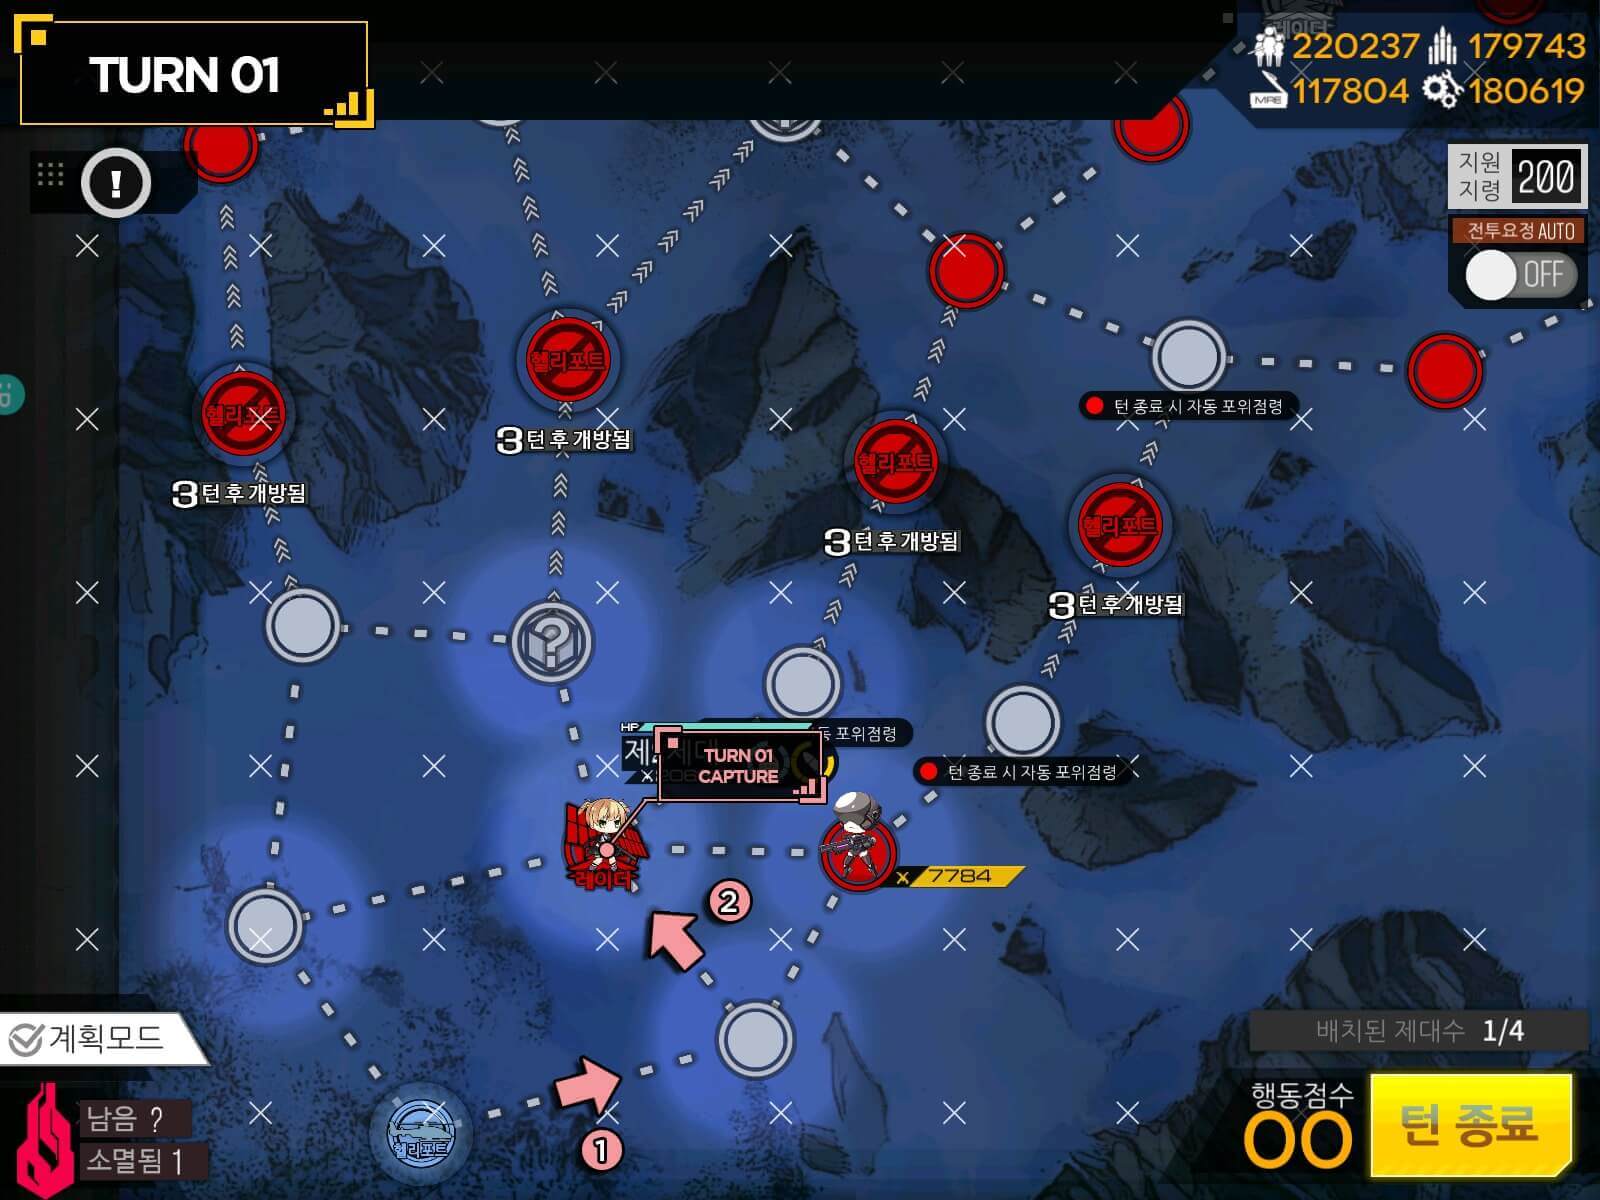
Take radar to get vision of all enemies and locations of Jupiter Cannons. There will be a path either with 0, 1 weakened, or Full Strength Jupiter Cannons. If weakended or 0 Cannon path doesn't reveal on 3 helipads on the right, you are locked in to the left most helipad.

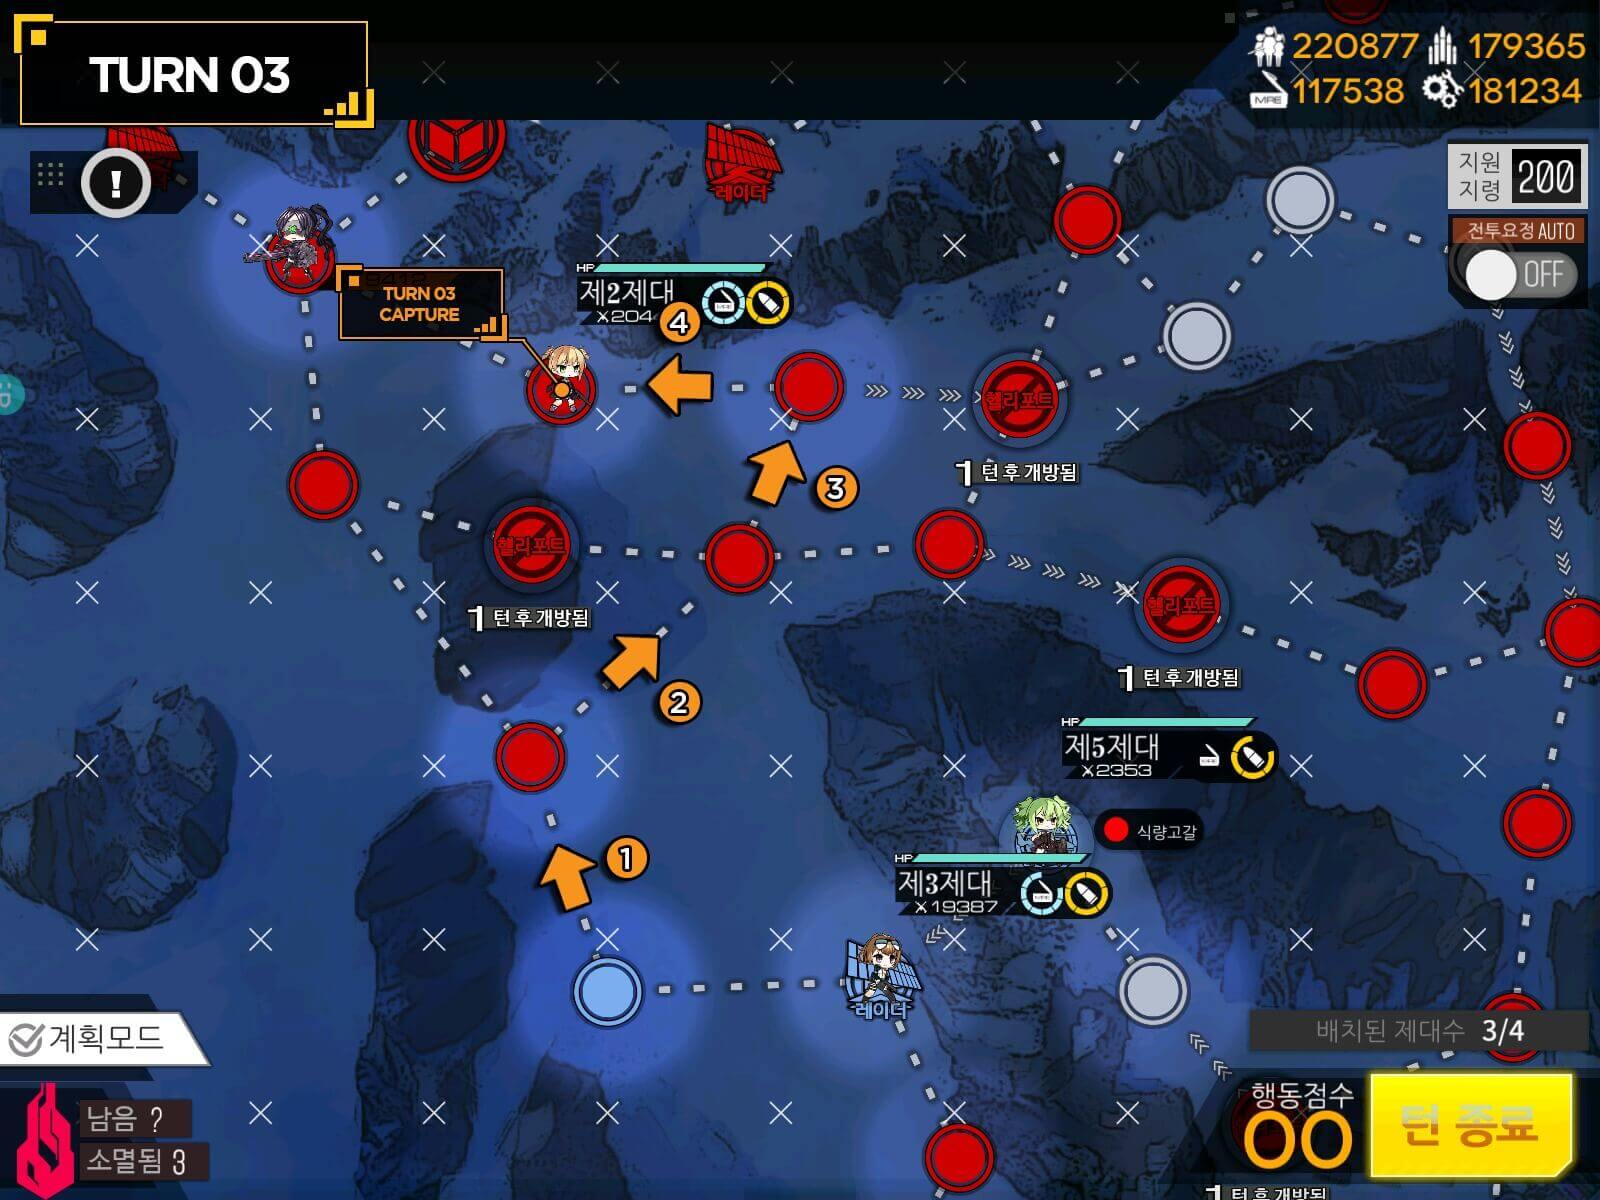
The "?" node is 100% enemy ambush. For me I decided to spawn the 2nd Echelon early rather than move up to take helipad. We will resupply here before moving on.

Beginning of Turn 3, I move to take helipad and move up the 2nd Echelon close behind. There are armor units and regular units mixed in the area. So I would recommend mixed echelons for the job unless it has sufficiently high enough CE or AP.
Resupply and move to get into position to take the radar in the middle.

Set to control Radar station. Watch for your ammo count as echelon in charge of taking down the weakened Jupiter Cannon should have least one ammo going into turn 6.

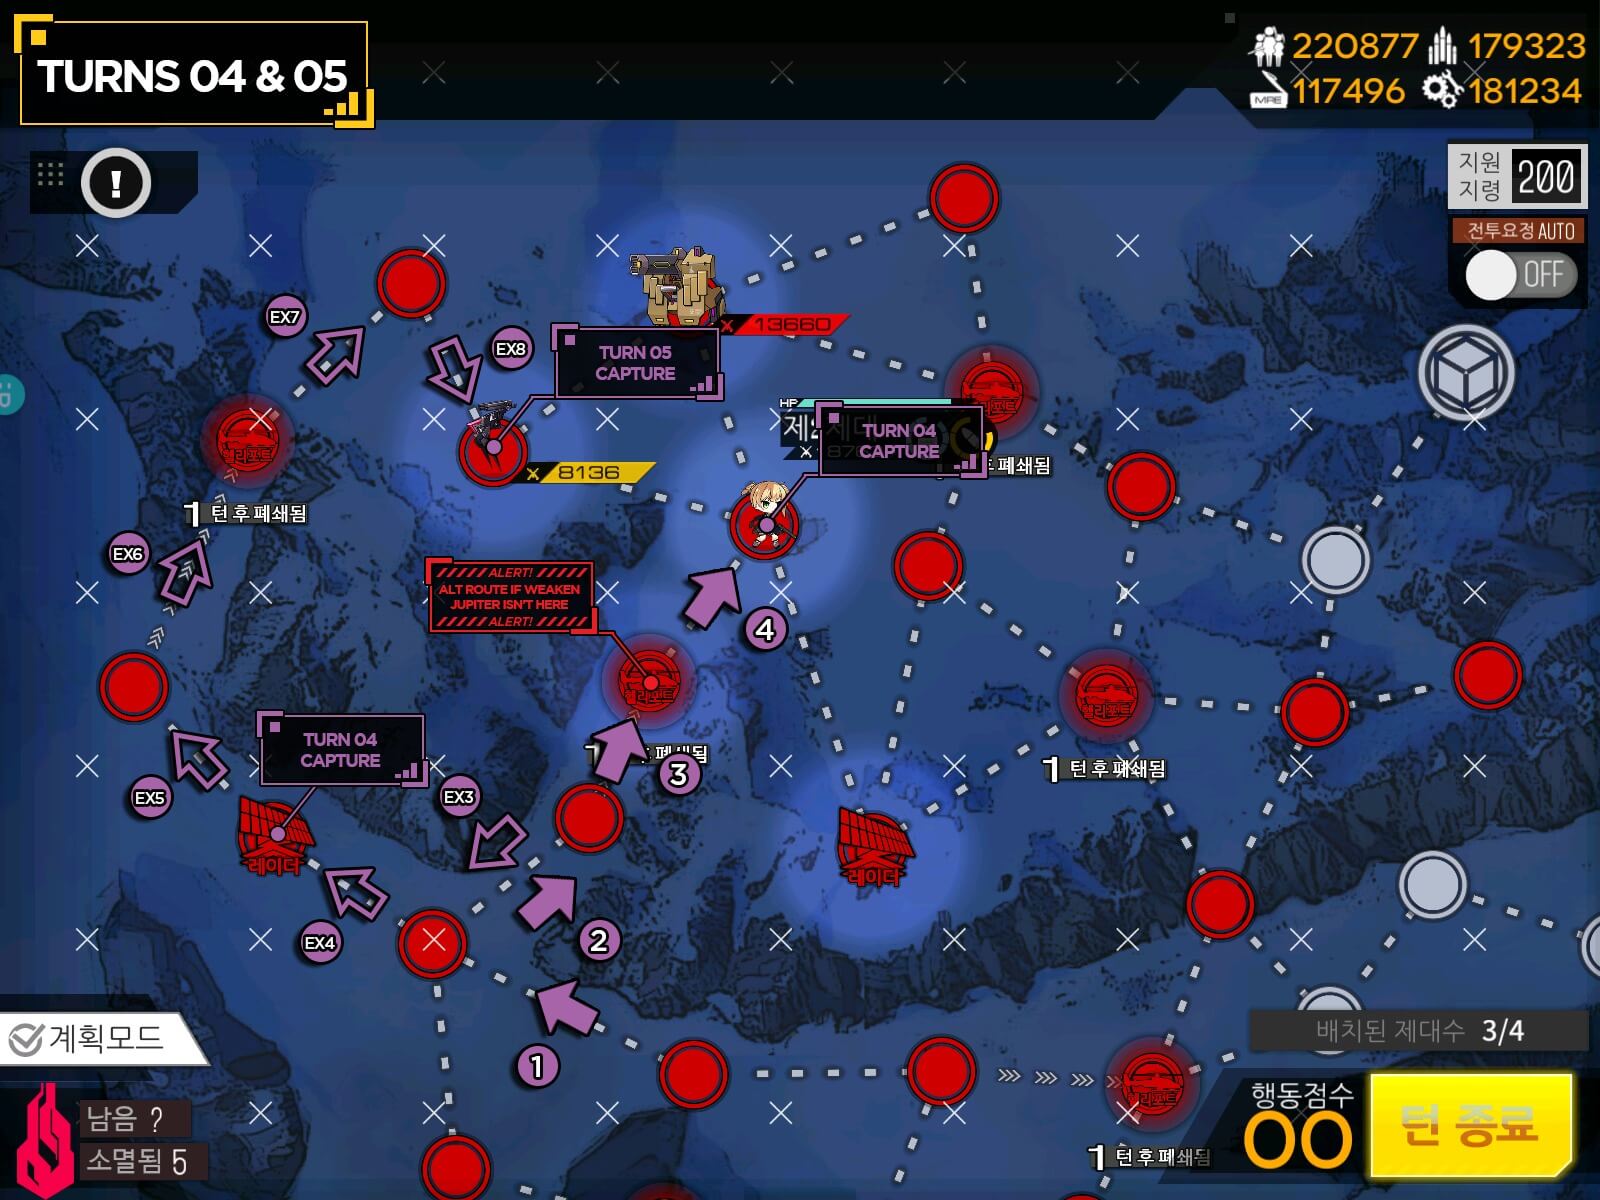
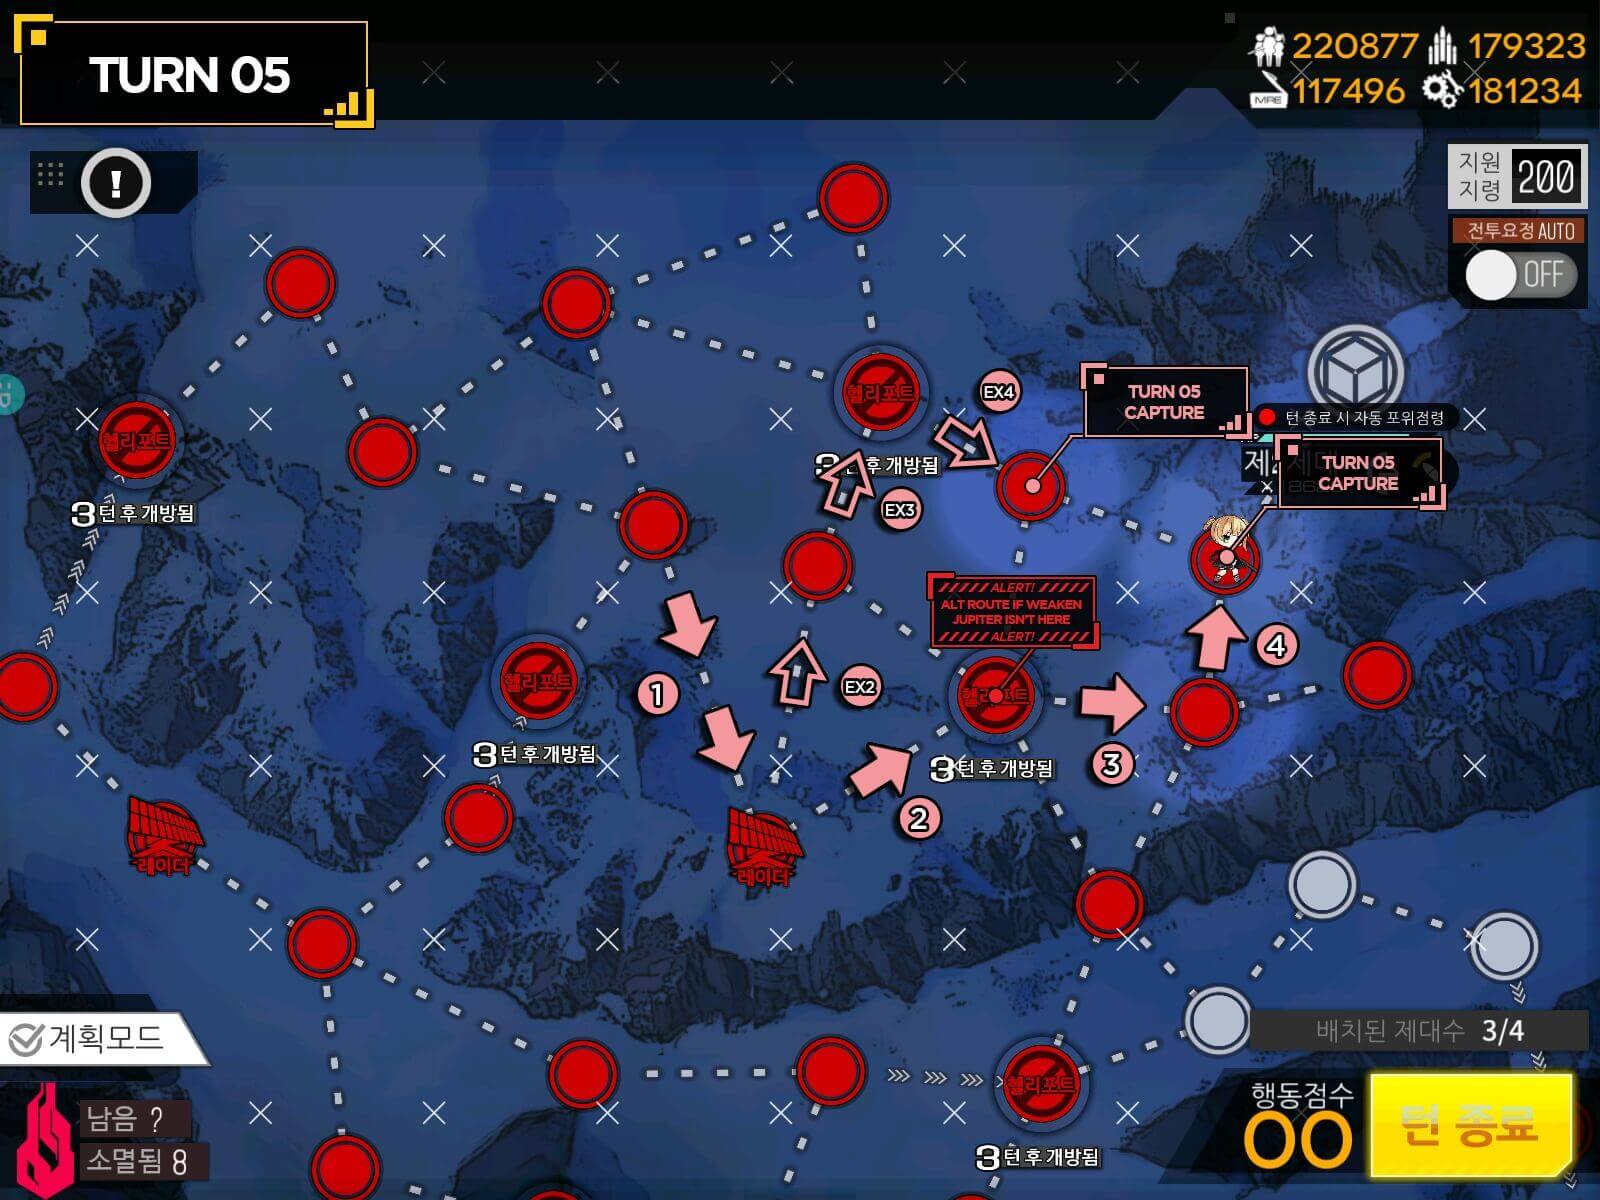
Similarly with 2nd Turn, we have to locate the weak or no Jupiter Cannon helipad to occupy. If you don't see it here, it's going to be the bottom most helipad which requires you to go around. Again watch your ammo account to get into position.

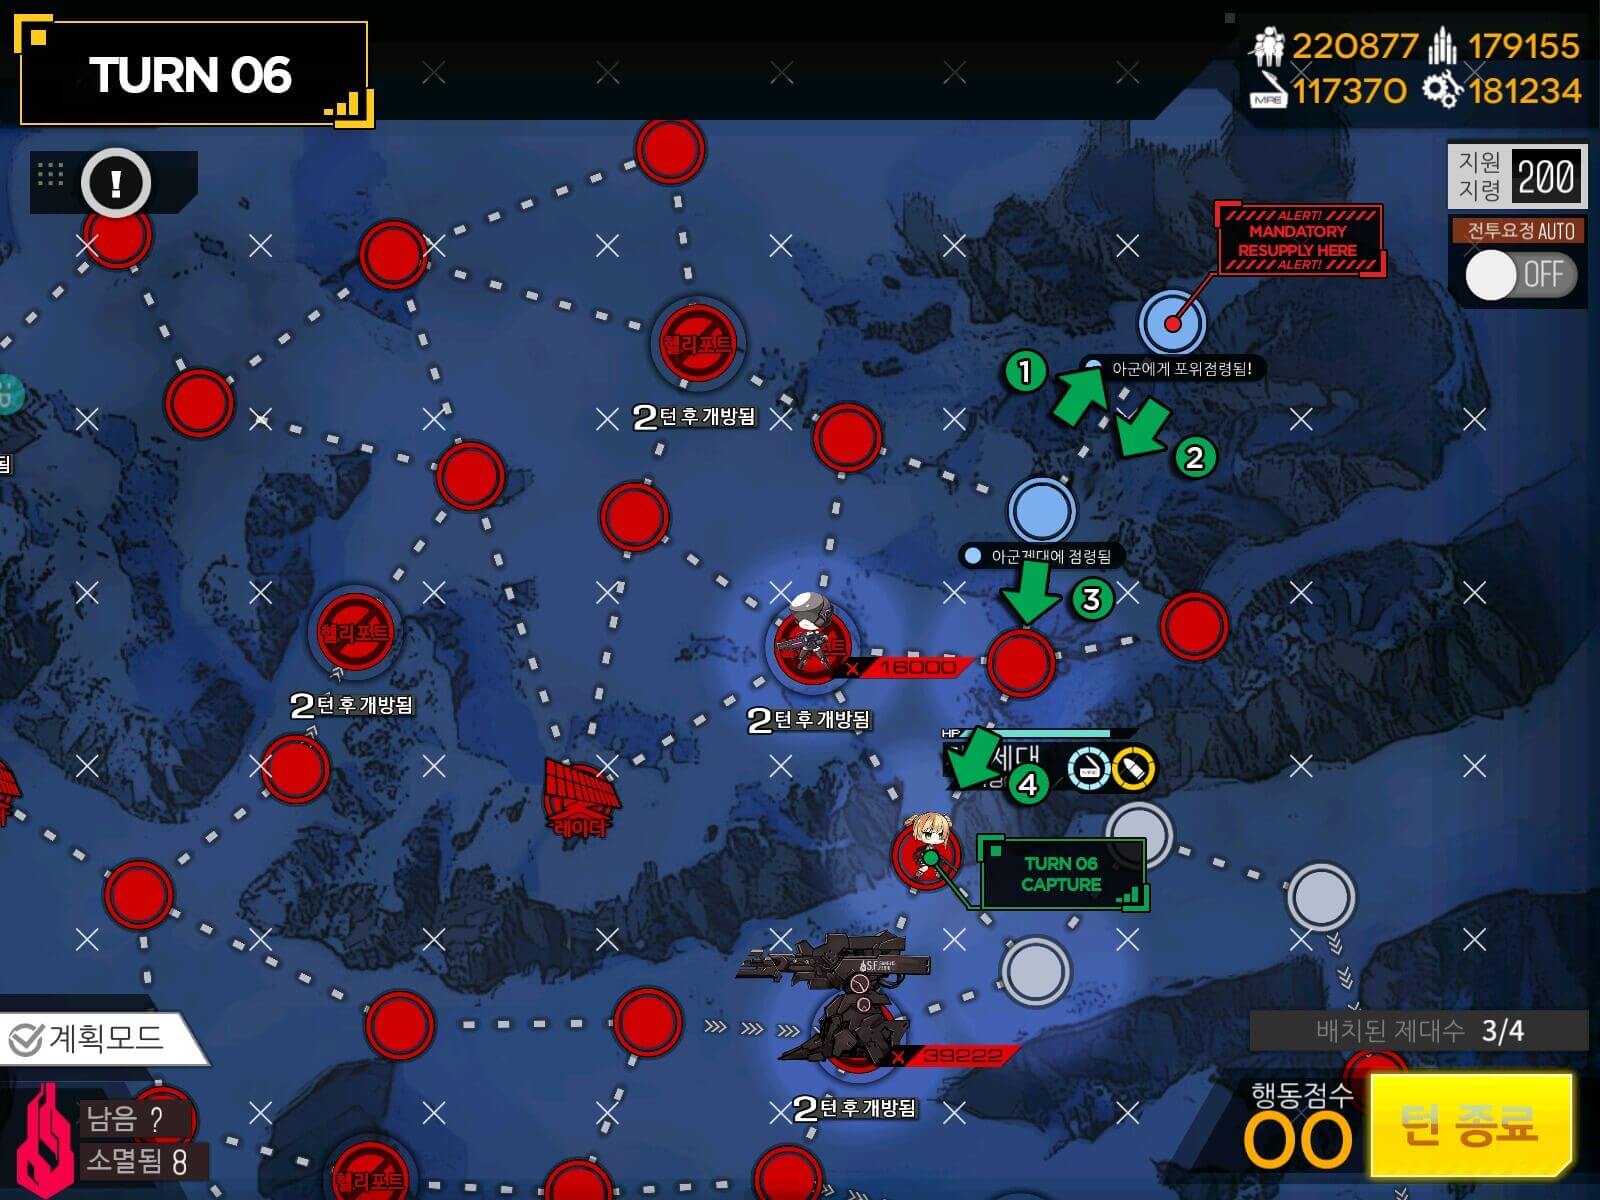
Once you resupply, make path to enemy HQ. If you get to helipad late and missed the turn it was open, Wait for resupply to be active before continuing. If you want to farm more equipment, now would be a good time to go with 2nd Echelon. Do watch out for the scout units close to HQ.
■ Operation Homecoming II
Shown Enemy Strength: 12,000
Echelon[s] Required: 2 [RF/mix echelon recommended] +1 Dummy HG
S-Rank condition: No Turn Limit. Take HQ.
 It's the last night mission map of the Arctic Warfare! Again with very similar play style: Find the helipad with a weak or no Jupiter Cannon, resupply in between and get to the Helipad safely. Scouts and Jaeger units on this map are no joke so make sure you take least one AoE AR or SMG to deal with them.
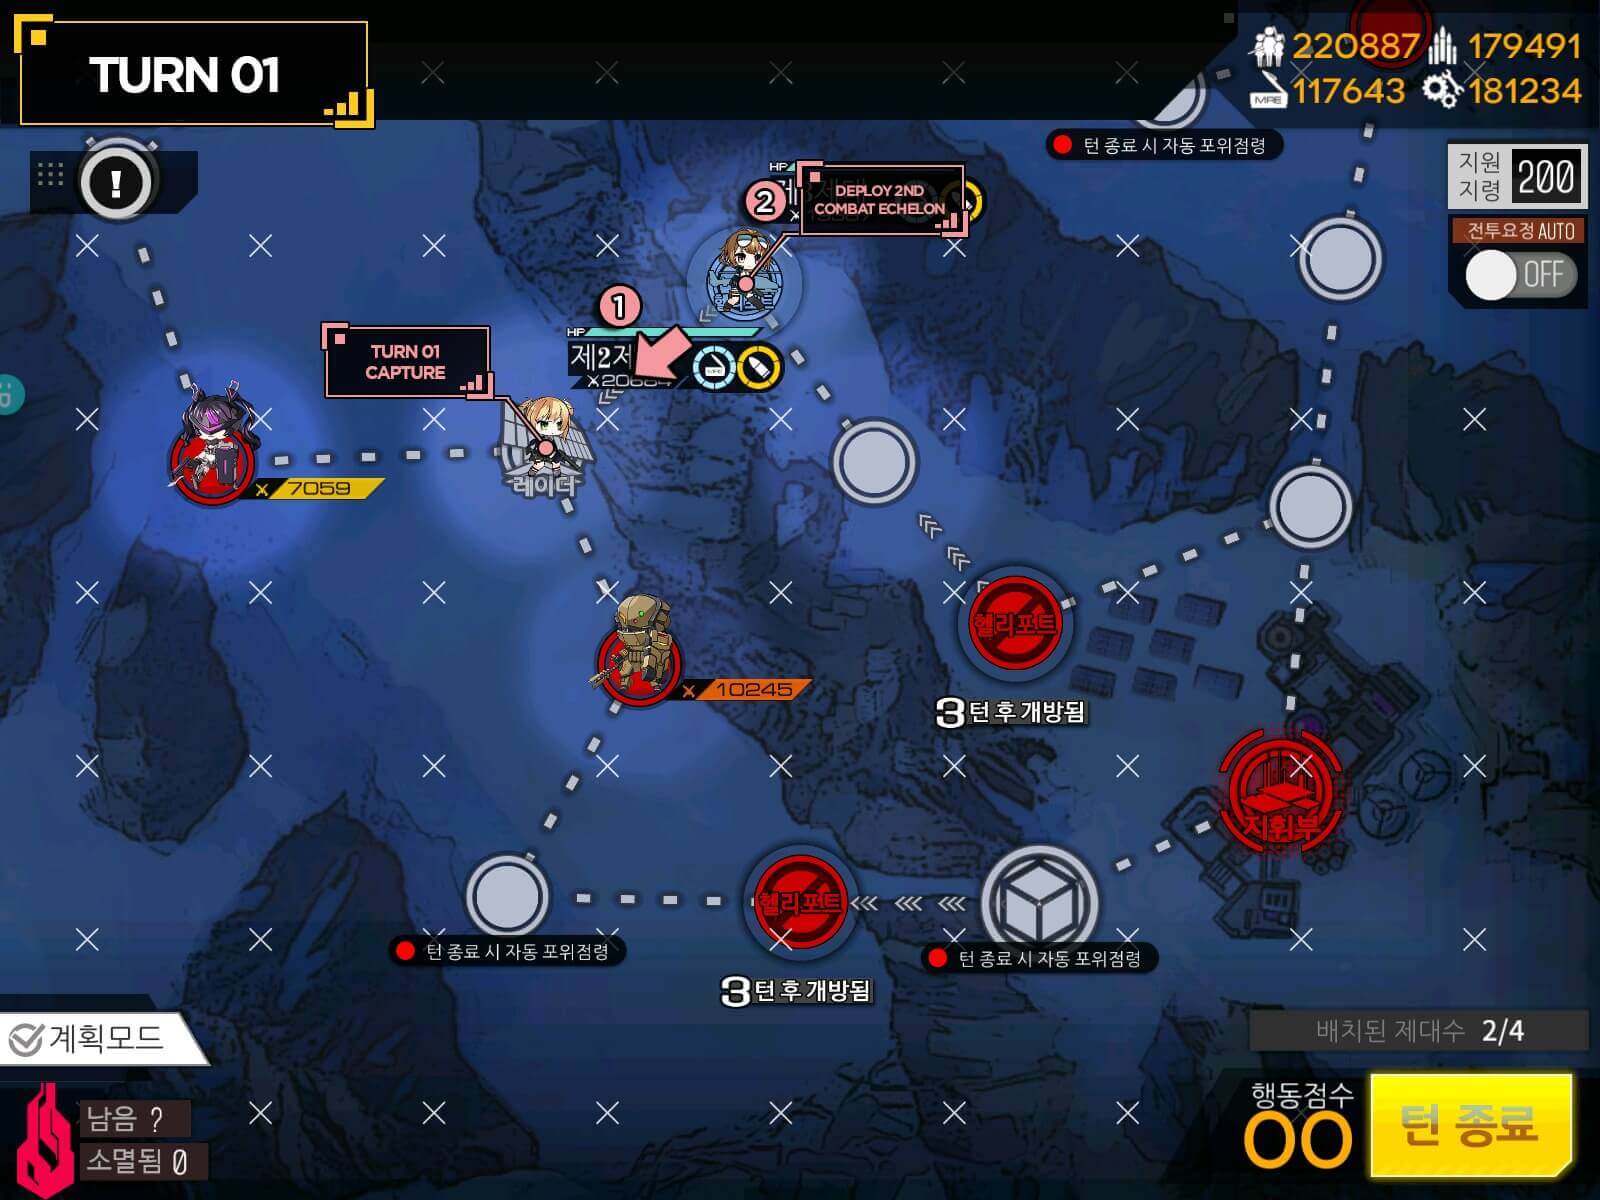

This is where you can opt to not use 2nd echelon at all and just use 2 HG dummy Echelons and keep that on top of the hill and enemies will not have any ways to get to you. You could go up to 3 echelons near HQ to gain that extra movements if you have ability to.
You can go around the other way here straight to supply node on the top left, but I decided to clear some units that could get to the RF echelon at the bottom and resupply as well.
I took shorter path because I found the weakened Jupiter on the first try, but if you are unlucky, take the longer path which will take you one extra turn.
There are lot of enemy units here so make sure to resupply using the node.
Resupply and all there's left to do is to take the HQ.

■ Operation Homecoming III
Shown Enemy Strength: 16,000
Echelon[s] Required: 3 [AR echelon with AOE skills recommended, MG echelon works great here] + 1 Dummy HG
S-Rank condition: Kill 12 Units in 10 turns. Take HQ.
Map with introduction of Brutes. They are fast moving melee units that can be quite dangerous to the front line. Additionally you will have to go around the long way to capture the HQ since you cannot physically move on to it. So only way is to surround capture.
For this guide I have limited my Echelon use to 4, but this map will get easier if you can use more than 4 Echelon for extra movement points. Warning: 4 Echelon method does not S rank the map 100% of the time.
Get your Crit scopes and AoE skills, it's about to rain bodies.

Spawn 2nd Echelon for combat or HG dummy.
Now the base is starting to get threatened by enemies coming from either side. Summon your 2nd combat Echelon if you have not already. Keep the Dummy HG in the middle between combat Echelons.

By now your main Echelon should be start to get low on ammo. Use swap method to refill ammo before moving further down the alley. Then summon your 3rd Combat Echelon.


Both Dummy HG and 1st Echelon is going to move twice each to capture the Helipad on the bottom. If Dummy HG is being threatened by enemy from top, Swap position at the end with 1st Echelon. Move 3rd Echelon to side of HQ to surround Jupiter cannon by HQ.

This turn is where you will have to make choice: Move top or down. This will depend on amount of enemy units present in the path: You want to fight total of 5 times or fewer since you have no chance to resupply until you capture the helipad on each route. For me this was Top route. You are looking to gain a node right on top of the one direction path that comes down to your HQ. [highlighted in red ovals].
Now that 2nd Echelon does not need to defend the base from the top side, I have moved it to the bottom helipad to clear path for the bottom side where it takes more than 5 battles to get to the next helipad.
1st Echelon finally caps the node next to Enemy HQ on one side. For other Echelon at the bottom of the helipad, it moves to clear path. Don't over do it if your Echelons are not tanking well or taking too much damage. As long as other echelon can come around to kill the rest, you will be fine.

1st Echelon moves all the way to the bottom.

We don't have enough movement points to cap HQ this turn via surrounding, so we are just going to move as closes as we can for next turn.
Finally, move the rest of the Echelons up the path to gain control of 2 nodes next to HQ. And you are done!
■ Operation Homecoming IV
Shown Enemy Strength: 20,000
Echelon[s] Required: 3 [AR echelons with AOE recommended] + 1 Dummy HG
S-Rank condition: Kill 12 Units in 14 turns. Take HQ.
Clear Requirement: Kill Architect 10* times. [This can change in EN server]

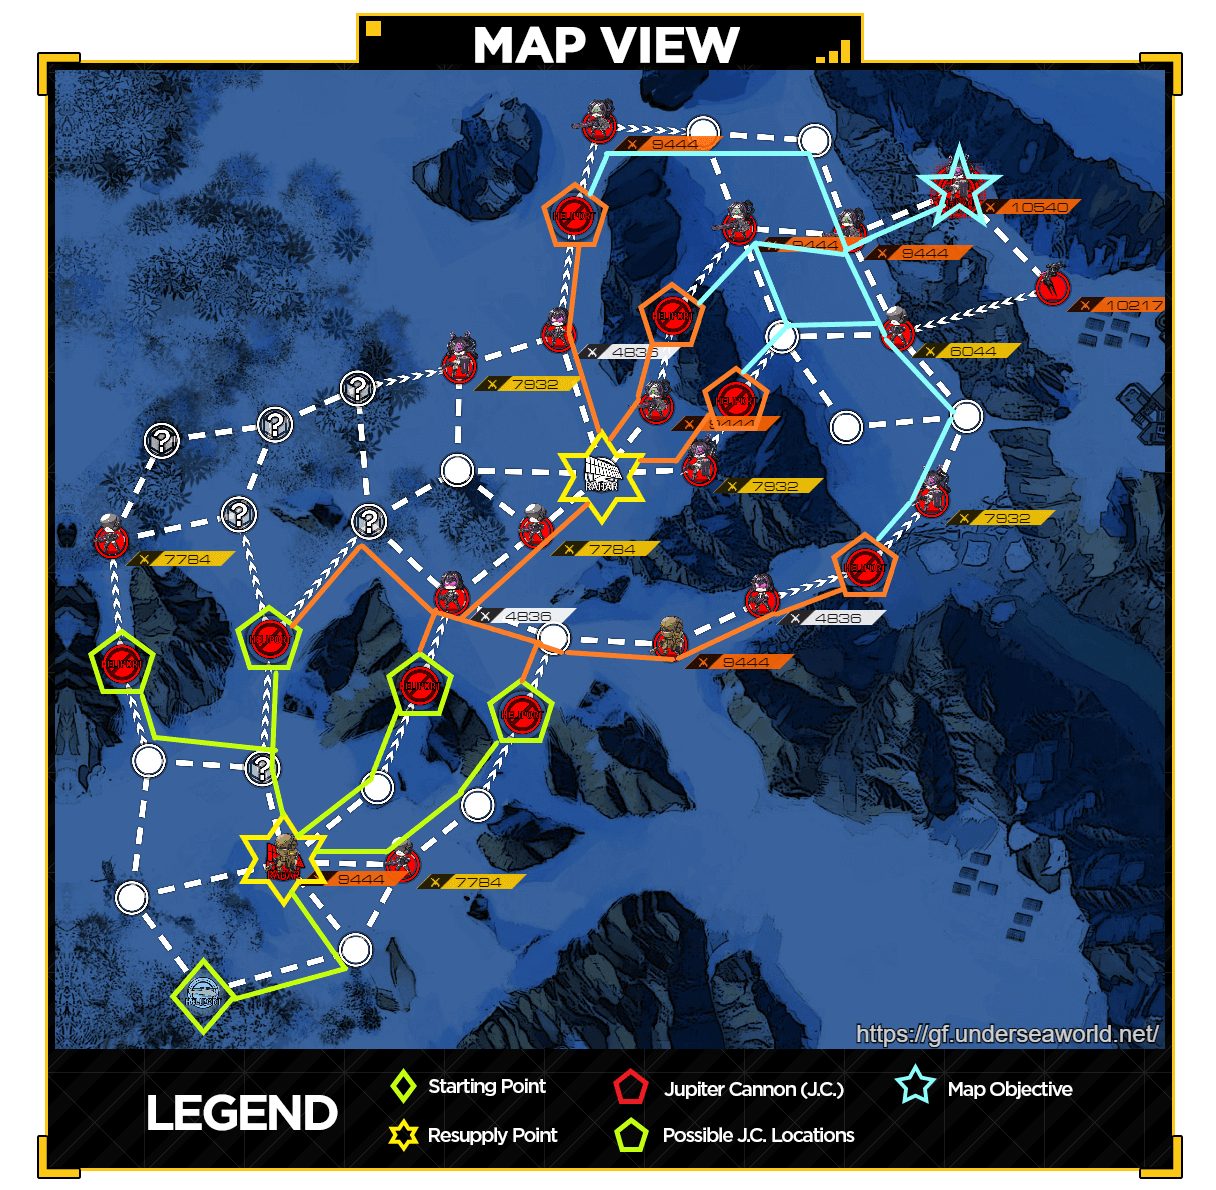
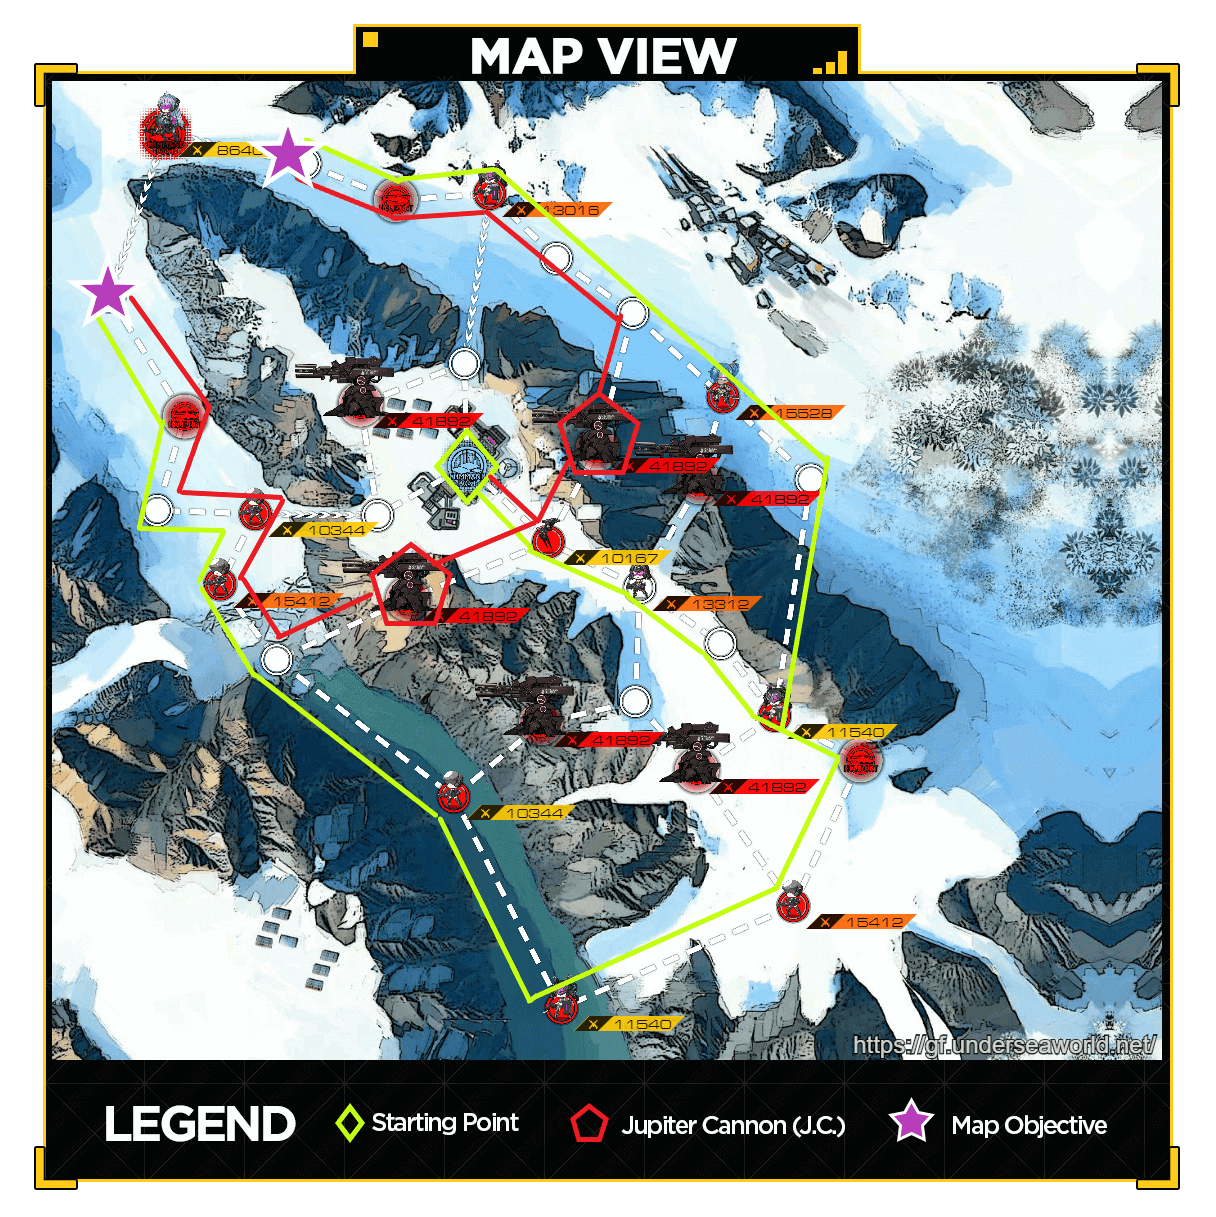
Map View: Again there's no real easy way out of this one. Retreating, repairing echelon, then redeploying might not be an bad option here. This map is intimidating at first since there seems to be a lot of thing going on. But only thing you should be aware of is that main objective is to kill Architect.
After some editing we have the following annotation of the map
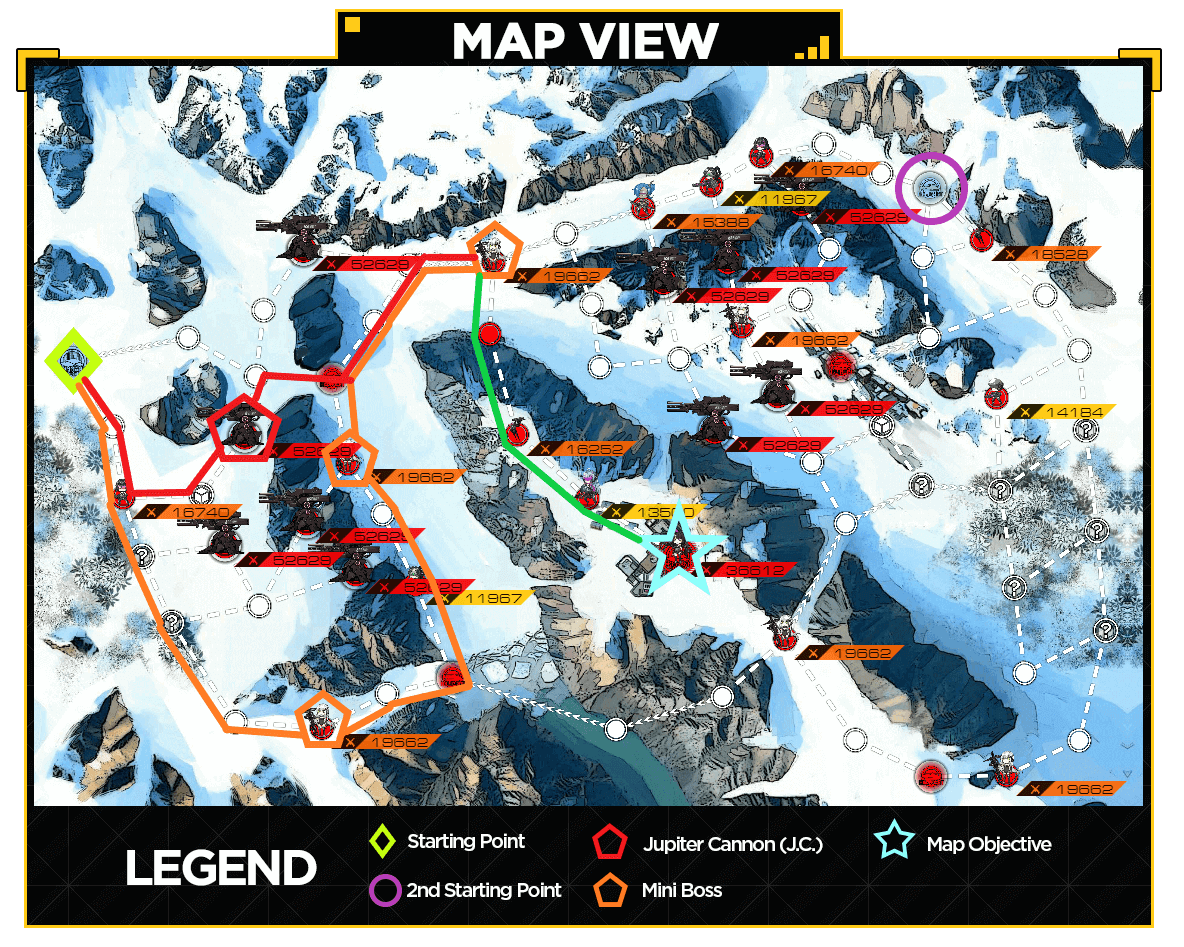
Only left half of the map is needed to get the mission clear. The purple circle on the right side of the map is optional pad where you can decide to place an Echelon but it will be fighting tough enemy units [Scouts and Jaegers].
This provides 2 additional movement points per turn, so weigh your pros and cons carefully. I will be going over the method that does utilize those 2 additional moves per turn.

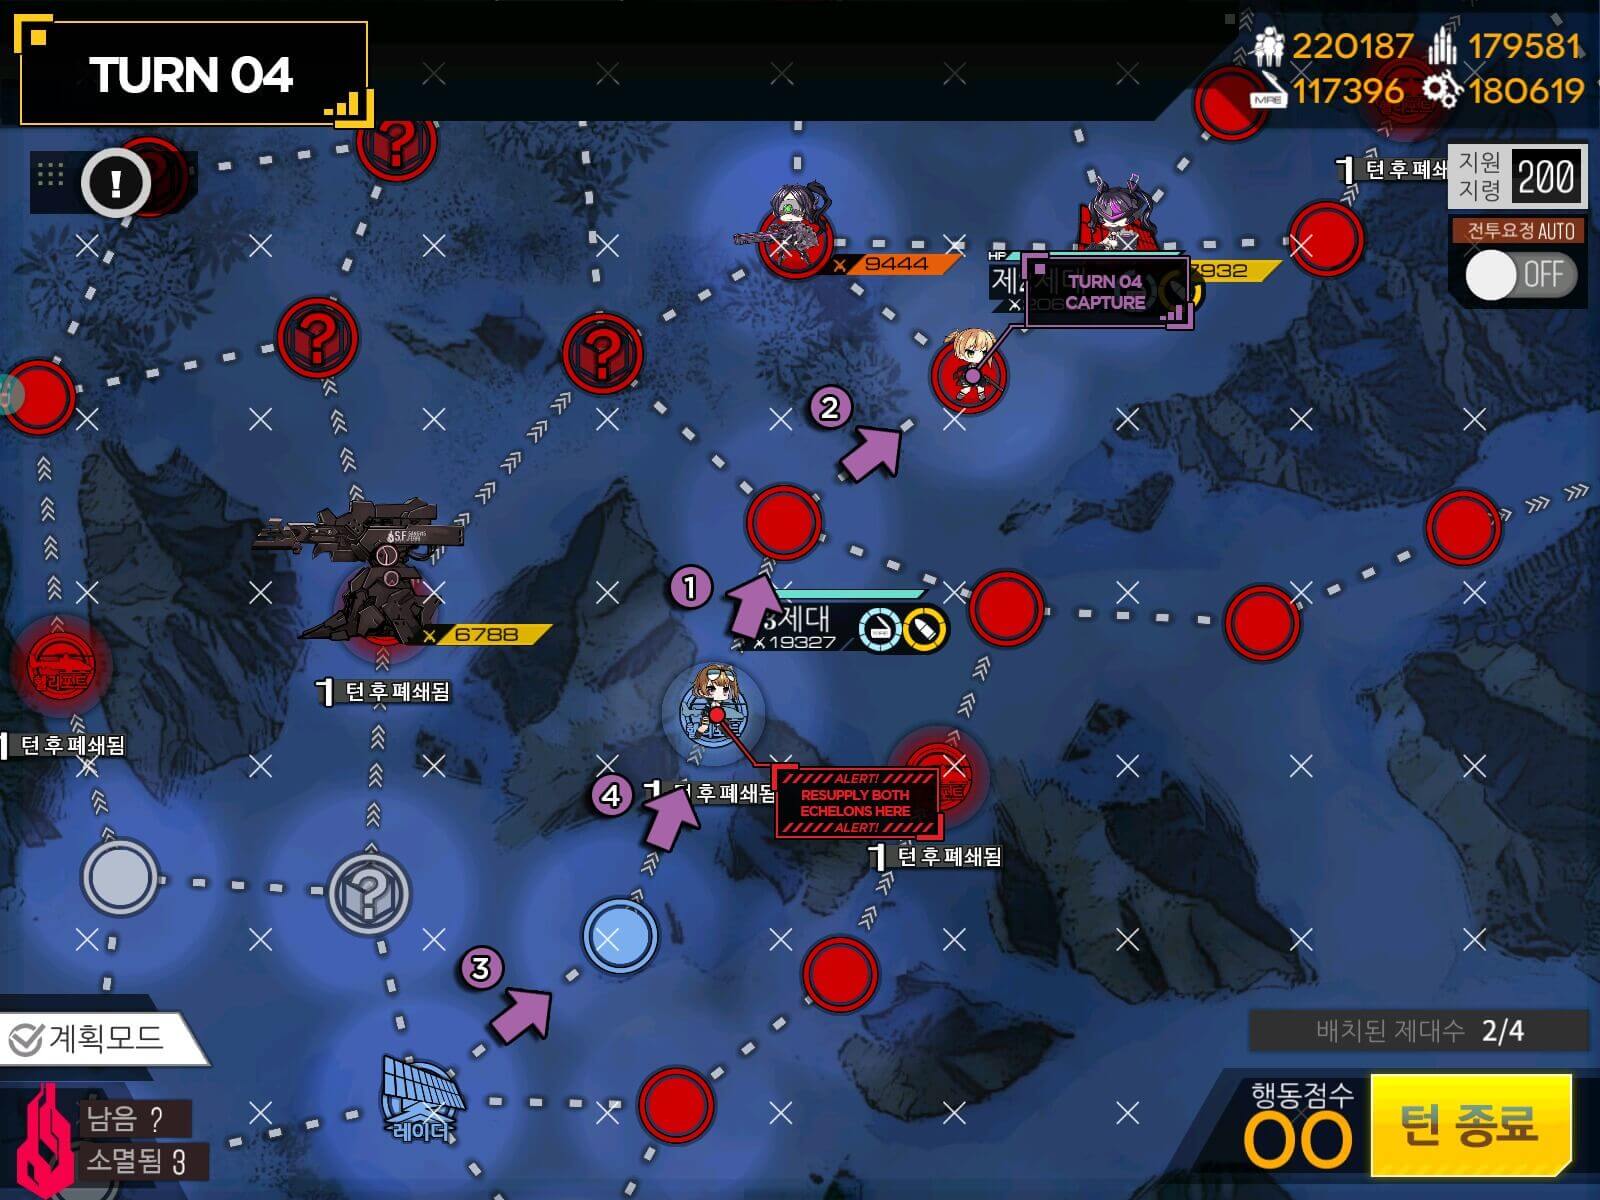
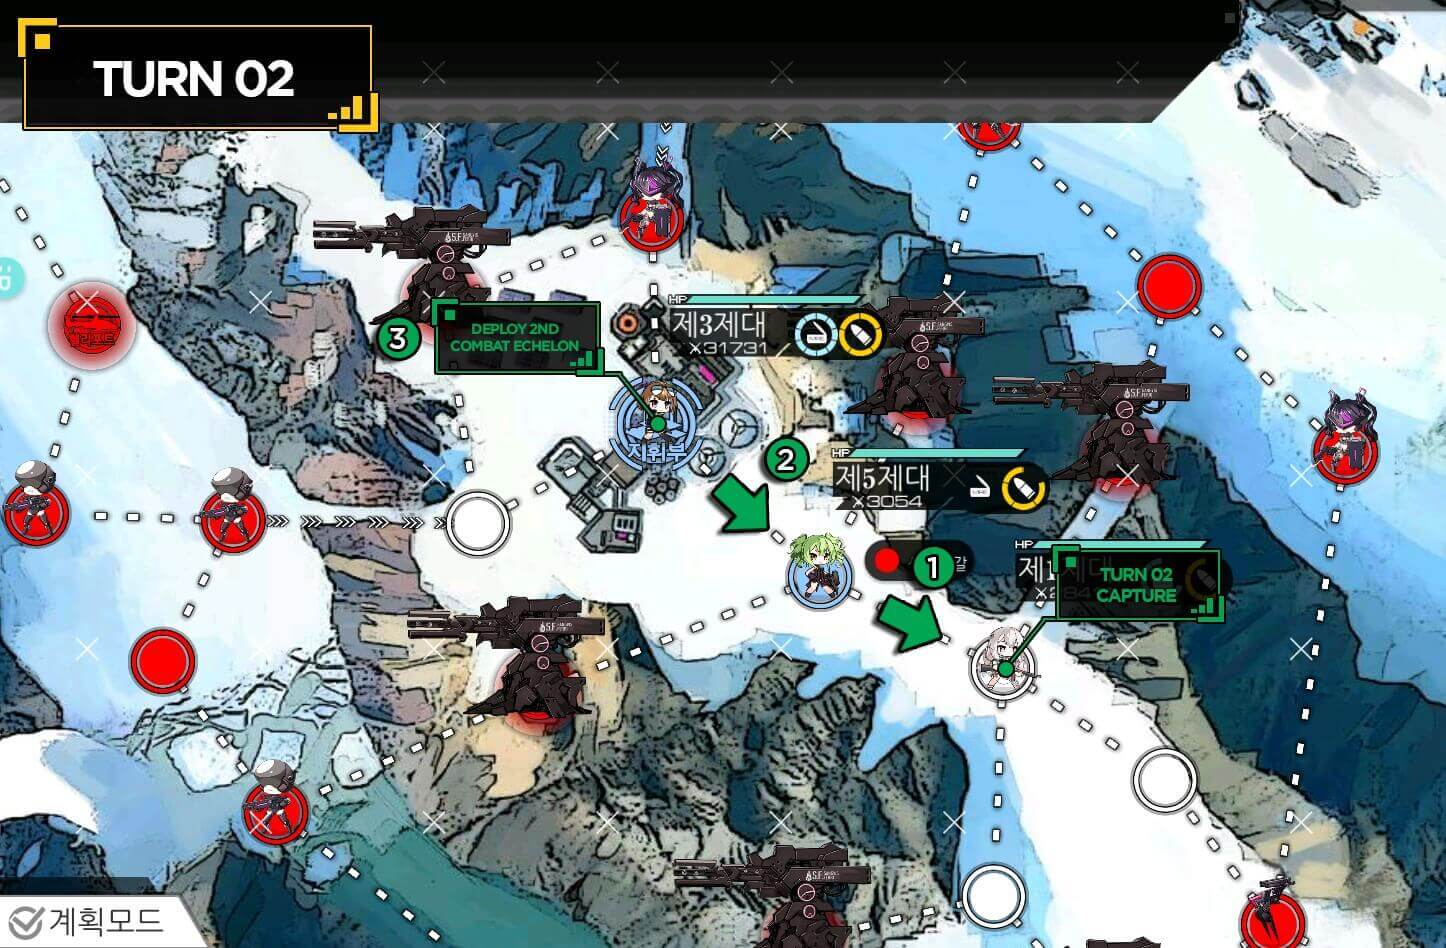
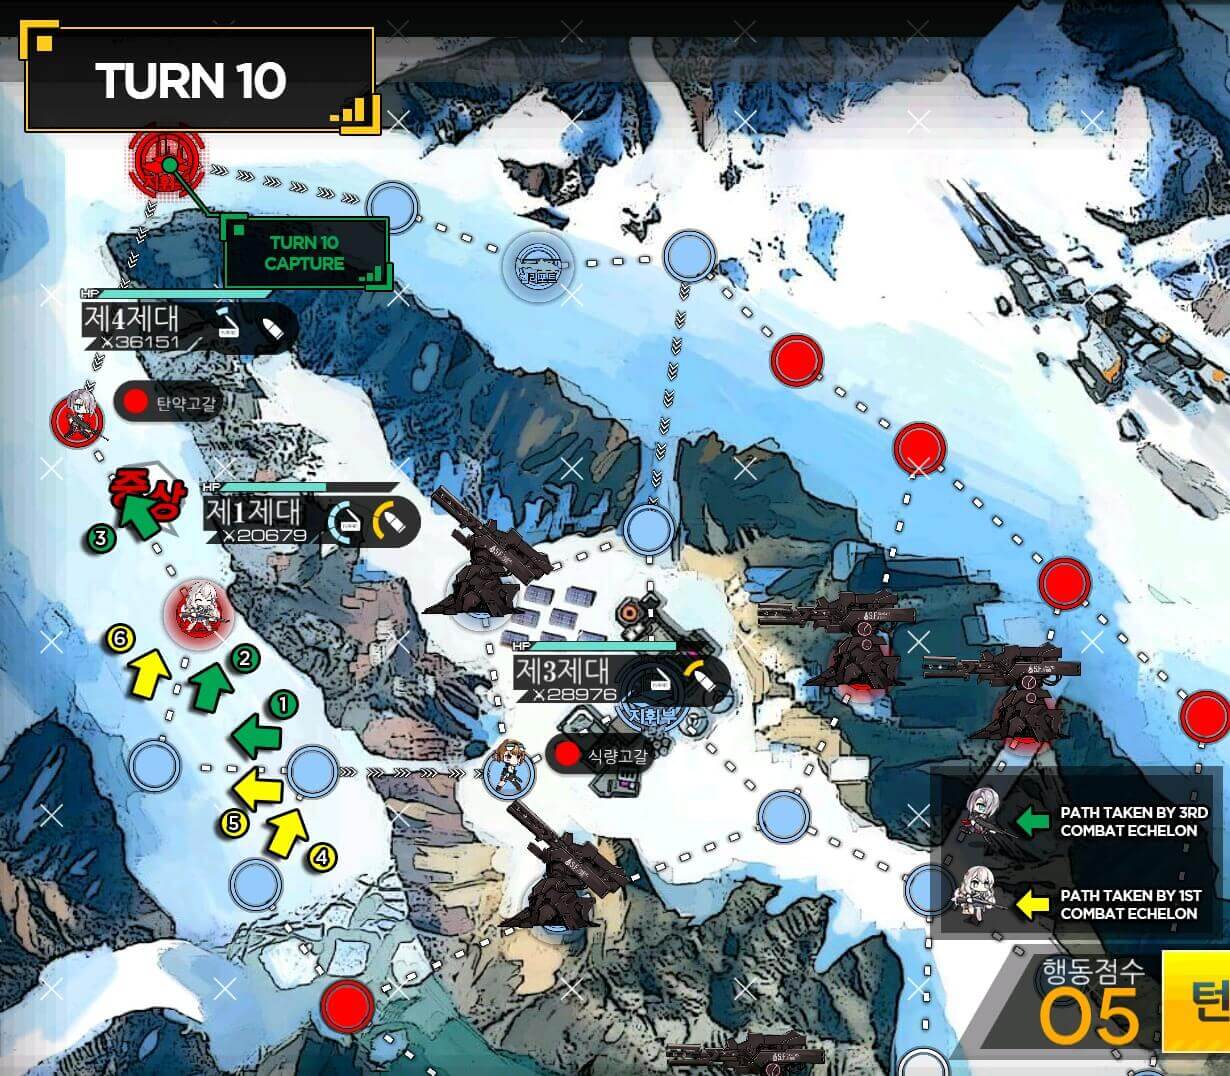
Spawn Echelon to defend potential enemy units from helipad on the right for remaining points. This run can be heavily depend on RNG which could let you clear in 4 turns or can get as longer than 6 turns. If you decide to put additional echelon on the far right helipad, you have potential to finish it in 4 turns with great RNG. If not, 6 is your average.

Solid green arrow route is when you know that You can take helipad with remaining ammo. If you cannot, resupply by backtracking before continuing. Why backtrack? Because both "?" Nodes on the way are highly likely to be an enemy ambush.

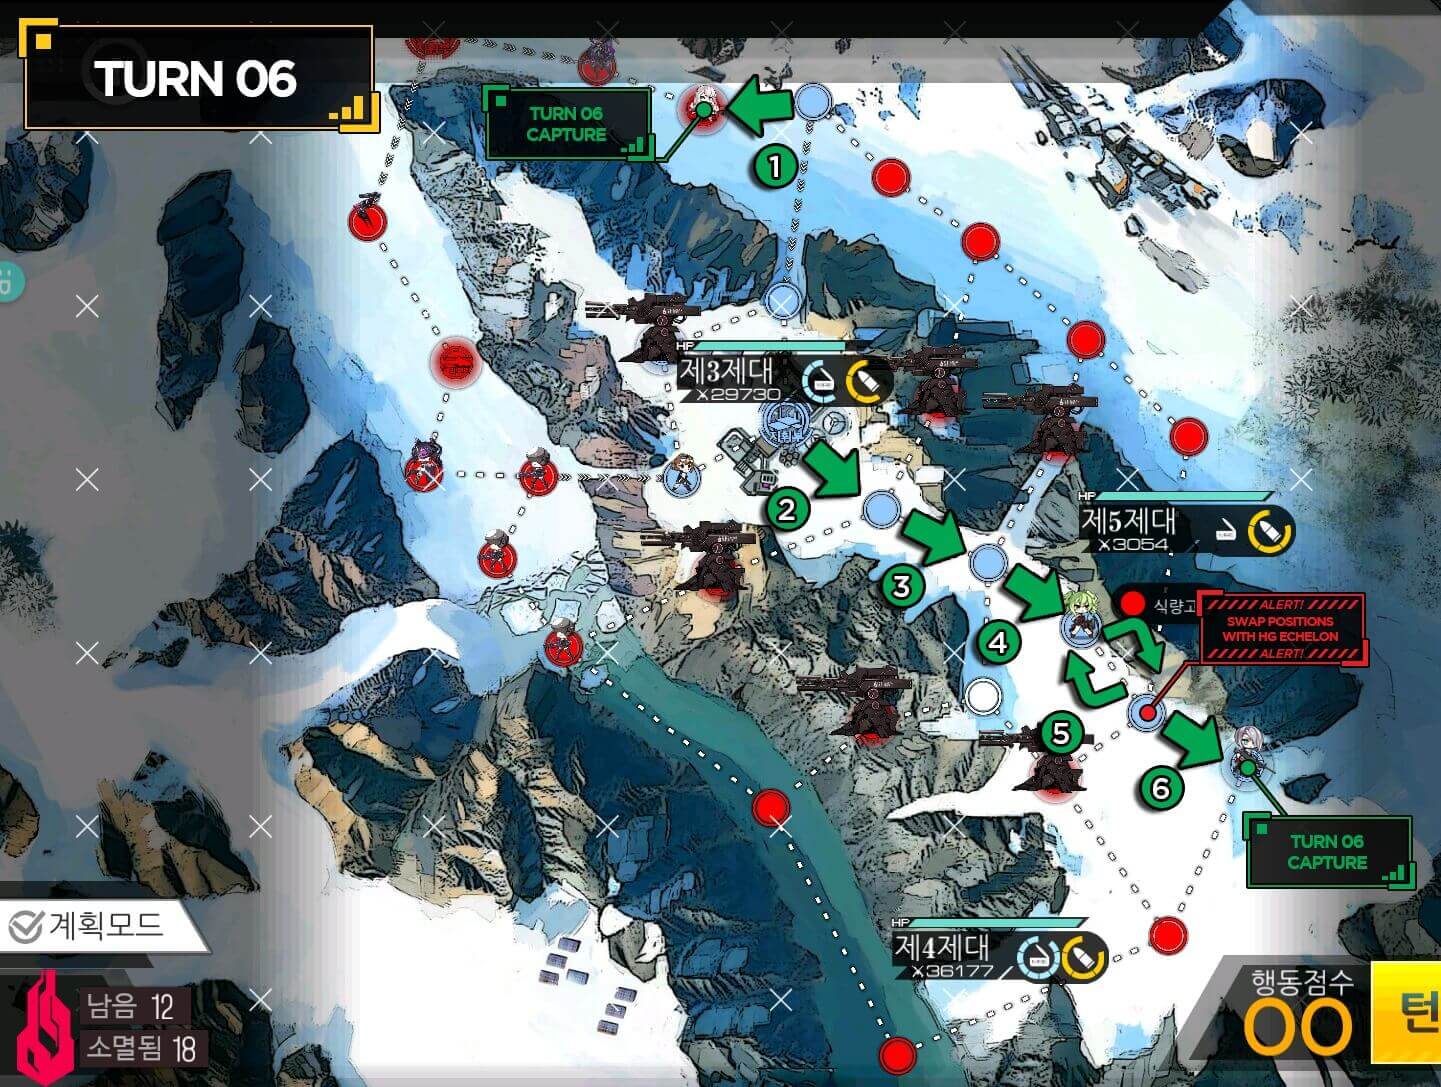
If you are lucky you do not need to wait another turn to capture the helipad, however in this case, you go for the Boss next turn after resupply and repair. If not like pictured above, just take another turn to cap the helipad and move on.

In a turn that I was waiting I went ahead and cleared the enemy unit that was between boss hunting echelon and Gager. This is also where you can decide it is worth forfeiting S-rank clear and call back the Echelon to heal up for 2 more boss fights. If it guarantees the clear, it wouldn't be a bad idea. Just a thought.

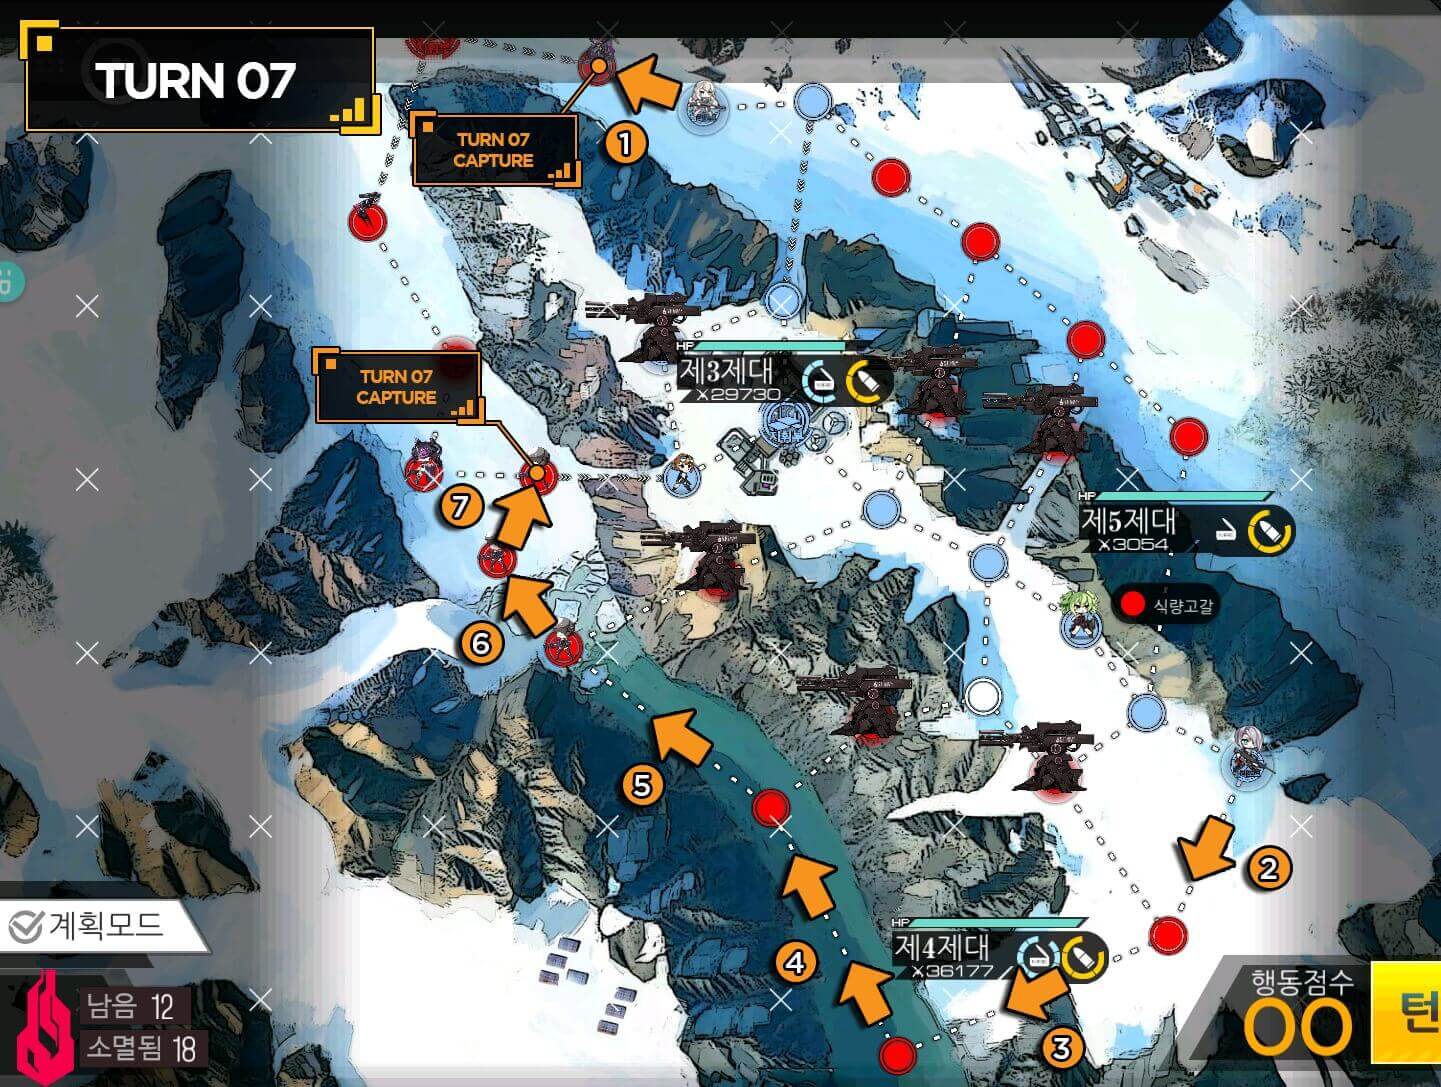
Move to clear out the final boss in the map. As usual watch out for her "+" shaped blast and you will be just fine.

Comments
Post a Comment