Chapter 2: Hyperbolic Function
Min. Requirements to beat Ch.2: level 70/4x echelon [with proper equipment] by the end.
E2-1
S-Rank Condition: Rescue 2 dolls by turn 7.
Required Squads: 1 Night AR + 1 RF HG
Shown Enemy Strength: 10,000


RFHG echelon [green route], takes care of armor side and Night AR echelon moves to capture temporarily helipad.

Rescue the first echelon. The dinnergates on radar node should not move from its starting location.

We are moving to surround capture the Jupiter cannon and helipad underneath which we will use to extract hostages.

As we done in the past, swap first then rescue the doll to save a move point.

Which ever echelon that has better frontline engages the Jupiter cannon to take it out, should not be an issue since it's weakened.

Manually extract hostages by clicking on the echelon on top of helipad and swap to finish extracting both dolls.

Map View: Map is divided vertically to non-armor side and armor side. if you are equipped adequately, you should have no issue.

RFHG echelon [green route], takes care of armor side and Night AR echelon moves to capture temporarily helipad.

Rescue the first echelon. The dinnergates on radar node should not move from its starting location.

We are moving to surround capture the Jupiter cannon and helipad underneath which we will use to extract hostages.

As we done in the past, swap first then rescue the doll to save a move point.

Which ever echelon that has better frontline engages the Jupiter cannon to take it out, should not be an issue since it's weakened.

Manually extract hostages by clicking on the echelon on top of helipad and swap to finish extracting both dolls.
E2-2
S-Rank Condition: Take HQ by turn 6.
Required Squads: Night AR with 1 MG in it. Or just full MG SG echelon. + 1 Dummy.
Shown Enemy Strength: 12,000


Goylat does not seem to have evasion on this map so MG has little issue dealing damage. Golyat Plus will not move so you are okay ending turn here.


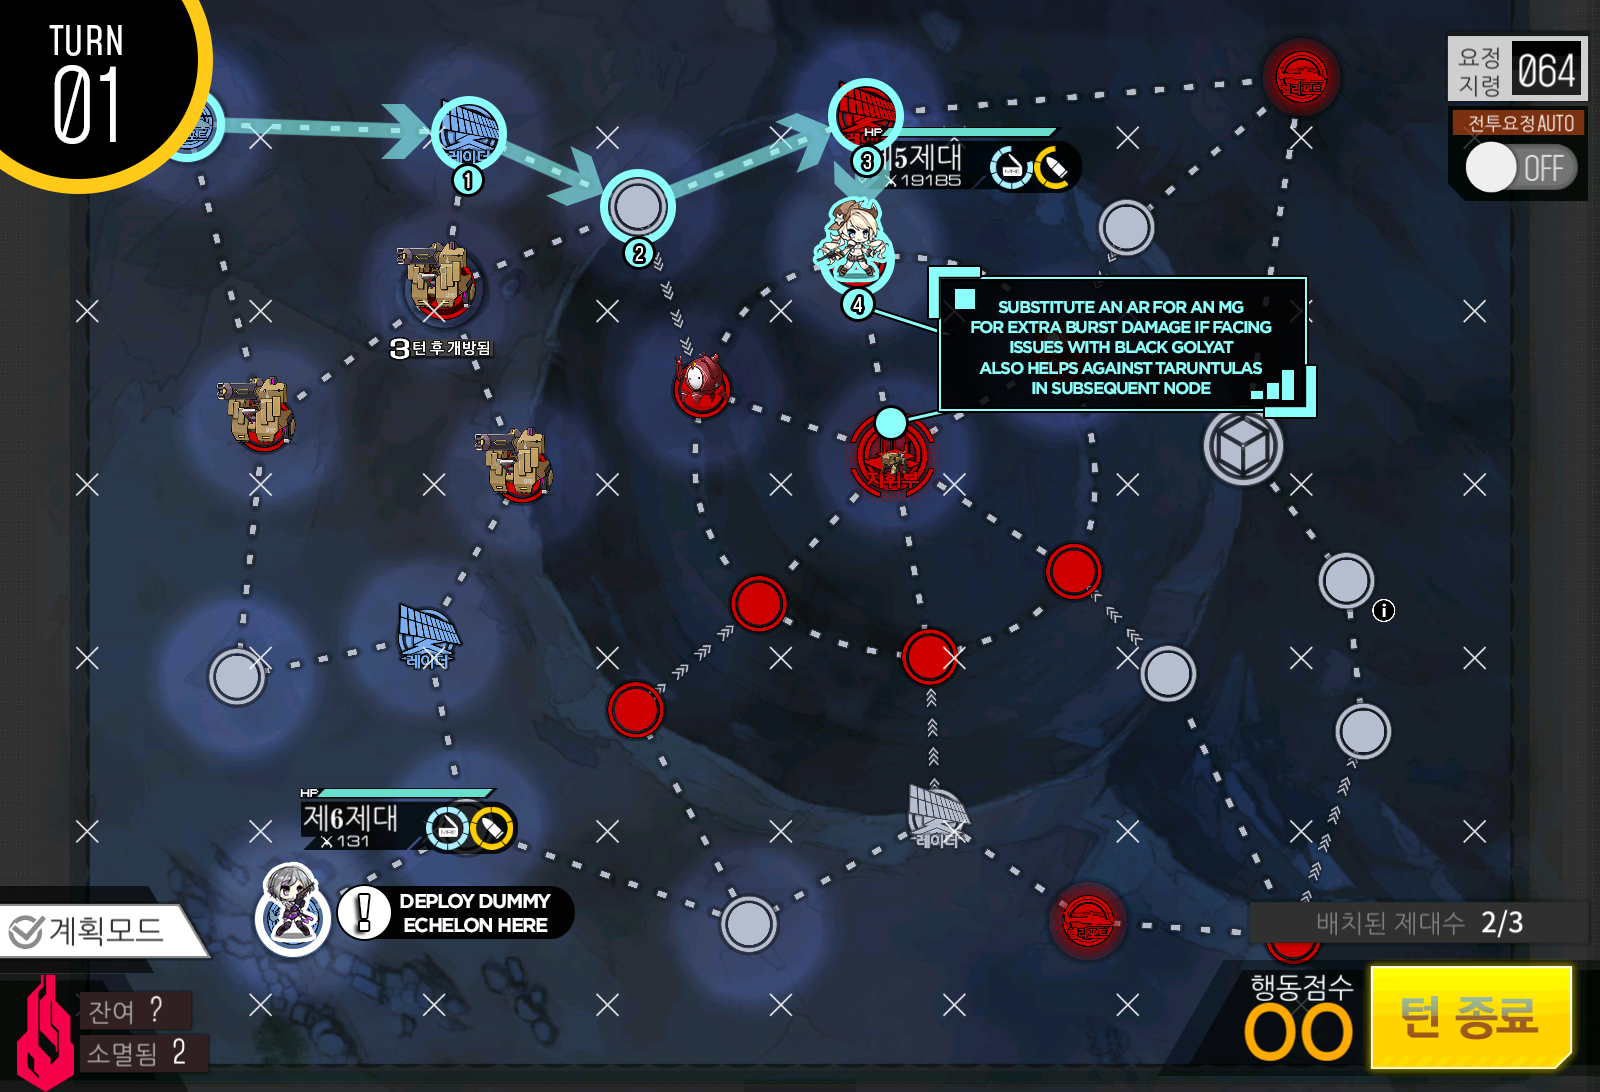
Map View: This is an odd map that you are required to take an HQ in a night map instead of eliminating all enemy units present. Strongly recommend Self-buff AR or MG to be included in the echelon to deal with tarantula unit.
Goylat does not seem to have evasion on this map so MG has little issue dealing damage. Golyat Plus will not move so you are okay ending turn here.

E3-3
S-Rank Condition: Establish Supply Route and maintain it for 2 turns by turn 10.
Required Squads: Night AR SMG + 1 RF HG + 1 Dummy
Shown Enemy Strength: 14,000


Start with 2 echelon that can take on armor units. 1st echelon takes care of Nemeum on the top and head back down.

End of turn 1 should look like this.

Before moving, make sure to spawn Dummy Echelon.

1st combat echelon takes long way around the Jupiter cannon, if you are low on resources, make sure to take the temporarily resupply node on your way.

1st combat echelon moves to take the node behind the supply route. Dummy Echelon also move to start connecting the route on the left side.


Map View:

Start with 2 echelon that can take on armor units. 1st echelon takes care of Nemeum on the top and head back down.

End of turn 1 should look like this.

Before moving, make sure to spawn Dummy Echelon.

1st combat echelon takes long way around the Jupiter cannon, if you are low on resources, make sure to take the temporarily resupply node on your way.

1st combat echelon moves to take the node behind the supply route. Dummy Echelon also move to start connecting the route on the left side.

1st combat echelon move to finish connecting the route. then continue ending turns until you finish the map.
E4-4
S-Rank Condition: Rescue least 1 doll by turn 8.
Required Squads: 1 Combat Echelon [Night AR preferred] + 1 Dummy
Shown Enemy Strength: 16,000


1st turn is where some RNG is required. After you rescue a doll and end your position above, if there's Golyat + adjacent to your echelon, you risk resetting right away.

Your goal is to maintain friendly node control under your combat echelon, so that when you get to the end of the map near helipad, you don't need 2 echelon to take the nodes because it's fully surrounded. Avoid the battle if you can, so that you don't run out of ammo by turn 5.

Again if you are looking to beat with just 1 combat echelon, you are looking to have 1 friendly node adjacent to you at all times when ending turn.

For me I had unfortunate luck of running into garm early on, which makes total of 2 boss battles. However if your echelon is well leveled and well skilled, you can take on even with no fairies!

Garm will guard the helipad, forcing you to fight through it next turn.

You will have situation where there could be an enemy adjacent to your echelon or not like my case. If you can, resupply and come back to current end spot to ensure you can fight.


Map View: Unfortunately this can take some RNG involved when it comes to dodging Golyat plus on turn 1. I will cover a method which does not use 2nd combat echelon nor parachute fairy. Strongly recommend taking your strongest dolls available.

1st turn is where some RNG is required. After you rescue a doll and end your position above, if there's Golyat + adjacent to your echelon, you risk resetting right away.

Your goal is to maintain friendly node control under your combat echelon, so that when you get to the end of the map near helipad, you don't need 2 echelon to take the nodes because it's fully surrounded. Avoid the battle if you can, so that you don't run out of ammo by turn 5.

Again if you are looking to beat with just 1 combat echelon, you are looking to have 1 friendly node adjacent to you at all times when ending turn.

For me I had unfortunate luck of running into garm early on, which makes total of 2 boss battles. However if your echelon is well leveled and well skilled, you can take on even with no fairies!

Garm will guard the helipad, forcing you to fight through it next turn.

You will have situation where there could be an enemy adjacent to your echelon or not like my case. If you can, resupply and come back to current end spot to ensure you can fight.
Garm Boss Pattern
Garm has 2 patterns, one being a rocket barrage that targets tile 8, 5, 2. Then followed by laser that shoots through center row plus another row either up or down of rocket barrage. setting up echelon like gif will minimize the incoming damage.

Once helipad is taken, just extract hostage to clear the map!
Comments
Post a Comment